Summary
This guide helps you effectively set up workflows in HubSpot using the ProvenExpert plugin to automate survey send-outs, create individual links, gather survey metrics, and manage contact enrollments. By following these steps, users can streamline survey distribution and analyze feedback data efficiently.
Preconditions:
-
User is authenticated into both the HubSpot and ProvenExpert systems.
-
Contacts are created in HubSpot.
-
Enrollment triggers are set up as required in workflows.
1. Connect your HubSpot account
Step 1. Connect your HubSpot account
Connect your HubSpot account using the link below:
Step 2. Login to your HubSpot account.
Use your usual HubSpot login here. You will be redirected to a page where you can select your HubSpot account.
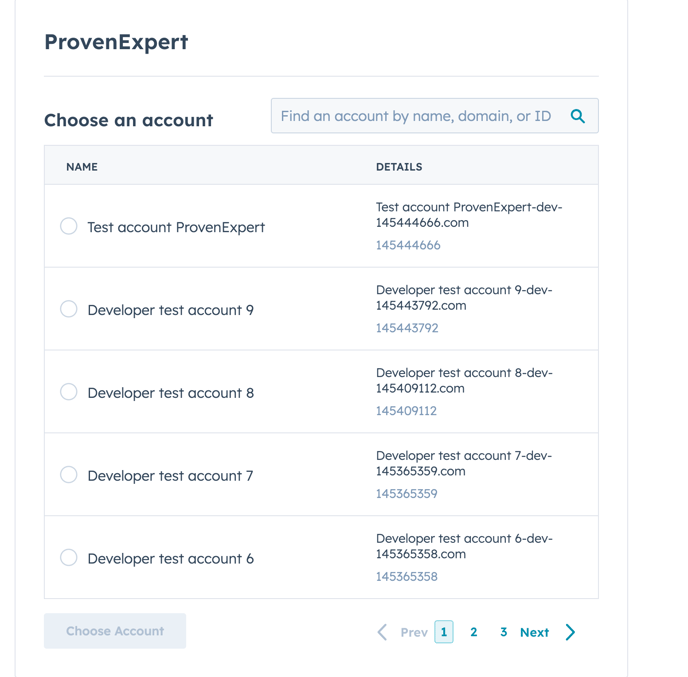
Step 3. Select your HubSpot account
You need to choose your HubSpot account from the list of available accounts.
Step 4. Confirm your permission
ProvenExpert is designed to integrate seamlessly with your HubSpot CRM, ensuring that your customer feedback data remains under your control at all times.
With the ProvenExpert plugin installed, you and your team will be able to:
-
Easily connect and manage customer reviews.
-
Create and send unique survey links to your customers.
-
Collect survey statistics to use metrics for further workflow actions.
-
Automatically send survey invitations to your customers.

Step 5. Connect your ProvenExpert account
To connect your account, you'll need to enter your Username and API key from your ProvenExpert account. You can use the link below to navigate to the correct page and access these credentials.

|

|
How to Uninstall ProvenExpert.
If for any reason you need to uninstall ProvenExpert then you can do so within your HubSpot integrations settings page.
You can find this page by opening HubSpot and navigating to Settings > Integrations > Connected Apps.
Uninstalling ProvenExpert will not affect your HubSpot data in any way. If you wish to reinstall ProvenExpert then you can connect on the website again (or follow the setup guide above on 1. Connect your HubSpot account)

2. Setting Up a Workflow in HubSpot
Step 1: Create a New Workflow
-
Login to HubSpot and navigate to Automations → Workflows.
-
Click Create workflow and select the From Scratch option.
-
Choose Contact-based and proceed to the workflow editor.
The workflow editor screen is opened, ready for further configuration.
3. How to Use the "New Review" Trigger in HubSpot
The HubSpot is a CRM system and spins around objects like contact, company and others.
Each time when flow is running one object must be set by trigger. It means need to connect a survey with object you want to work with.
If you do not have specific information about the email, you need to create an additional flow that will trigger the "New Review" trigger. To do this, you need to create an extra flow with an action "Attach survey".
If you have information about a specific email, you can skip the first step in this block and proceed to the second step.
Step 1: Attaching a Survey to a Contact
Before using the "New Review" trigger, you need to attach a survey to the contact object using a HubSpot workflow. Follow these steps:
-
Navigate to HubSpot Flows:
-
Go to "Automations" > "Workflows."
-
-
Create a New Contact-Based Workflow:
-
Select "Create from scratch" for a new workflow.
-
-
Set the Trigger:
-
Choose the trigger "When filter criteria is met."
-
Under "Contact properties," set the filter as "Create Date" is "known."
-
-
Add the Action:
-
In the actions section, scroll to the bottom and select "Attach survey" under the "ProvenExpert" options.
-
-
Choose a Survey:
-
Select the appropriate survey you want to attach to the contact.
-
-
Save and Publish:
-
Save the changes and publish the flow.
-
Step 2: Configuring the "New Review" Trigger
Once the survey is attached, you can set up the "New Review" trigger. Here's how:
-
Navigate to HubSpot Flows:
-
Go to "Automations" > "Workflows."
-
-
Create a New Contact-Based Workflow:
-
Select "Create from scratch" for a new workflow.
-
-
Set the Trigger Type:
-
Choose the trigger type "When an event occurs."
-
-
Select the Event:
-
Under "Custom events," choose "New Review for CONTACT."
-
-
Save the Trigger:
-
Save the selected trigger and proceed.
-
-
Add Actions Below the Trigger:
-
Add any necessary actions to be performed when a new review is received.
-
-
Use Trigger Properties:
-
To access the event properties, select "Trigger event properties" from the dropdown labeled "View properties or action outputs from:"
-
-
Save and Publish:
-
Save and publish the workflow.
-
Important Notes:
-
Custom Events:
-
Once you attach a survey, your account will automatically add four custom events under "Data Management" > "Custom events," named "New Review for CONTACT." These events should not be altered or edited.
-
-
Detaching a Survey:
-
If an object is no longer connected to a survey, use the "Detach survey" action in a similar flow to remove the survey attachment.
-
4. Automating Survey Send-outs
Step 1: Add ProvenExpert Action
-
In the workflow editor, click the + button to add an action. Open the ProvenExpert Test Plugin and select the “Automate survey send-out”.
-
Choose a survey from the Survey dropdown and add the Email property where required, matching the input name.
-
Click Save and then Review & Publish.
-
Click Skip to turn on and then Turn on Workflow.
The workflow is published, and surveys are ready to be automatically sent out.
Step 2: Enroll Contacts for Survey
-
Click the Enroll button in the workflow editor.
-
Select Choose individual contacts and pick contacts from the list.
-
Click Enroll to add them to the workflow.
A notification confirms the manual enrollment of contacts.
Step 3: Verify Survey Send-out
-
Navigate to Enrollment history.
-
Check the Action succeeded section to verify that the survey link was successfully sent.
The server response code should be 200 (indicating success), and the survey link is sent to the enrolled contact.
5. Creating Individual Survey Links
Step 1: Set Up the Workflow
-
In a Contact-based workflow, click the + button.
-
Open the ProvenExpert Test Plugin dropdown and select “Create Individual Survey Link”.
-
Choose a survey from the Survey dropdown and add the Email property where required.
-
Click Save and then Test to preview the link for a contact.
The individual survey link is created for the specified contact.
Step 2: Review and Publish the Workflow
-
Set up the trigger and Create Individual Survey Link action in the workflow.
-
Click Review & Publish and Turn on Workflow.
-
Enroll contacts manually by selecting Choose individual contacts.
A notification confirms successful contact enrollment.
Step 3: Verify the Individual Link
-
Go to Enrollment history and reload the page.
-
Click on the enrolled contact and view the Action Succeeded section.
The generated individual survey link is shown in the details.
6. Gathering Survey Metrics
Step 1: Add the Action to Gather Survey Metrics
-
In the workflow editor, click the + button to add a new action.
-
Open the ProvenExpert Test dropdown and select the Gather Survey Metrics.
-
Choose the Survey code for which you want to retrieve the data.
-
Click Save to apply the settings.
The survey data (e.g., review ratings) is successfully retrieved and can be used for further workflow steps.
Step 2: Metrics with Task Creation
-
Add a task to the workflow and check task details.
-
Configure the task: Enter the task name, set a date, and decide whether an email reminder is needed.
-
Add notes: In the notes section, write the necessary property and, using the action outputs, select the property from the previous step, "Gather survey metrics."
-
Save the changes.
Task details show survey metrics.
Step 3: Metrics After Additional Reviews
Provide new review and verify updated metrics.
-
Open the created workflow with metrics.
-
Manually enroll a contact (or re-enroll the old one which used in TC1)
-
Navigate to the “Performance history“->>”Enrollment history” page
-
Click on the “View Enrollment“ (on the contact)
-
Open the “Action succeeded“ record.
Metrics reflect new review data.
Step 4: Metrics After Publishing Review
-
Verify updated metrics after review is published.
Unpublished count decreases.
Step 5: Metrics for Deactivated/Deleted Surveys
Check that deactivated and deleted surveys are not shown.
-
Click the “+“ button in the Workflow editor screen
-
Open the “Proven Expert“ dropdown menu.
-
Select the “Gather survey metrics“ option.
-
Search the deactivated survey in the dropdown menu
-
Search the deleted survey in the dropdown menu
Surveys do not appear in the dropdown menu.
7. Managing Enrollment and Logs
Step 1: Manual Enrollment of Contacts
-
In the CRM → Contacts section, select a user.
-
Click More → Enroll in workflow and choose the workflow.
-
Click Enroll to add the contact.
A notification confirms the successful manual enrollment of contacts.
Step 2: View Action Logs
-
In Automations → Workflows, find your workflow.
-
Click More → View Details.
-
Go to Action logs and click on the Event details for actions like Create Individual Survey Link or Gather Survey Metrics.
The event details page opens, showing the generated individual survey link or gathered survey metrics.
8. Testing Workflow Features
Testing Enrollment and Survey Send-out
-
Single Contact Enrollment: Verify that the workflow enrolls and sends the survey link to one contact as expected.
-
Multiple Contact Enrollment: Set up custom filters and enroll multiple contacts based on specific criteria, such as contact owner. Ensure the appropriate contacts receive the survey link.
The contacts matching the criteria should be enrolled, and all should receive the survey link.
Testing Survey Creation and Sending
-
Survey Search: Test the Survey dropdown search functionality by entering key symbols to find a specific survey.
-
Optional Data Fields: Test sending survey invitations with and without optional fields like Name.
The correct survey is found, and the optional data fields behave as expected.
9. Handling Errors and Duplicates
Step 1: Prevent Duplicate Survey Links
-
If a survey was already sent to a contact, enrolling them again should not send a duplicate survey link.
No duplicate survey link is sent.
Step 2: Test Workflow for Empty Properties
-
In cases where a contact lacks an Email property, the workflow will display an error when trying to send the survey link.
An error indicating "Following required properties were missing: email" is shown.